Before I dig into the meat of the "how tos" I want to go into what type of pattern would need a gusset.
"Hi
Laura, ...My question is: Does a gusset benefit every
garment? Why do some garments such as the portrait blouse have a gusset
while others do not." -Laura K.
ANSWER: The
whole point of a gusset is to improve arm movement, and there are
several factors that will be considered and as you might guess, all of
them relate to the design of the sleeve. A cut-on sleeve ( a one-piece
bodice and sleeve - often called a kimono sleeve) is generally the type
of sleeve than needs a gusset, especially if the sleeve is fitted and the sleeve tilts down at
the shoulder (such as the portrait blouse). Without a gusset, you could
not lift your arm without pulling the whole thing up. Gussets adds fabric
under the arm pit and allows the arm to move freely without pulling up the blouse.
Though I'll be using using Sew Chic Patterns LN1619 Portrait Blouse, this tutorial will apply similarly to any pattern with a gusset, or one that needs a gusset.
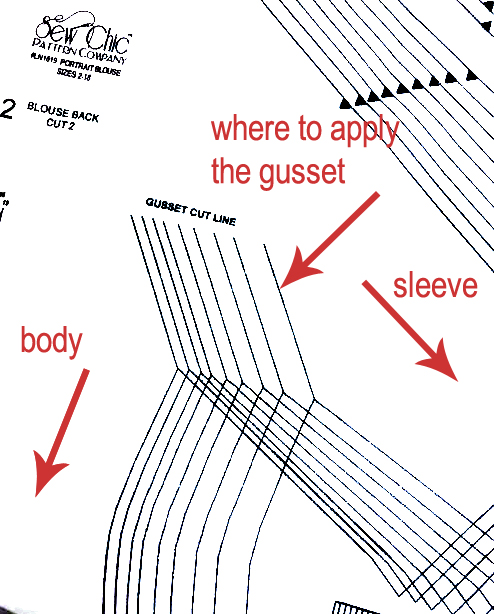
Your pattern will look something like this one where the body and sleeve of the garment are all one piece. You'll cut according to your size needs, and there will be a gusset line marking where the gusset should be sewn. It should point to the neckline.
During the layout stage, I must emphasize DO NOT CUT ON THE GUSSET LINE at this point, but DO mark the line on the wrong side of the fabric with your dressmakers carbon.
After marking, the end of the gusset line will need a bit of fusible interfacing. The heavier the better. You will be sewing really close to the raw edge and there won't be much of an allowance. Interfacing helps to keep that end stable and supported. I know you are going to ask me which kind of interfacing, so I recommend fusible woven or knit. Make sure to fuse it tightly to the fabric! Heat and steam do this.
The first "sewing" step is to mark the seam lines. I use a ruler and a chalk marker. The seam allowance is 1/4" where it crosses the garment seam line, tapering to nothing at the tip. It should look like a "V" with your original marked line running down the center.
Stitch, following the marked seam line. This is called "stay stitching." Use a standard or narrow stitch, especially at the tip to really support that narrow edge.
Now cut down the center along the "gusset" line.
Cut right the tip as far as you dare. If you don't cut far enough, it will cause puckering and this next step will be difficult to do.
If you haven't marked the seam allowance on your gusset, do that now. Correct any cutting misalignment. An accurate seam line here will produce a perfect fit to the bodice.
Pin one side only, seam line to seam line as marked, joining the corner of the gusset to the corner of the gusset line stitching. The bodice will taper to almost nothing at that corner, but it can't be nothing, or the two pieces wouldn't stay together.
Sew right over the top of the stay stitching.
When you get to the tip, with the needle now, lift the foot to adjust the fabric.
Reposition the fabric to align the seams and pin if needed. Make sure the fabric has been twisted to fit and doesn't have any bulk or bunching underneath. Lift the fabrics, as they can get caught on the feed dogs- make sure they are truly straight and aligned, then lower the foot and stitch down the other side.
Press seams toward the bodice. This gusset is complete. I do serge this seam after sewing and use a product called Fray Check to seal that tiny seam allowance on the bodice side.
You may have heard that Craftsy/bluprint has been purchased by an entity called TN Marketing, and that they have resolved to bring back the "old" Craftsy that we once knew and loved. They aren't really set up like the youthful Craftsy I enjoyed comrade with (teachers are still wondering about contract royalties) but for sure, as of now, the promise to keep your account and "forever" class purchases still stand. Hurray!
This image below is the landing page for my class, and correct me if I'm wrong, but it seems to me that this leading "important" statement could be used in a Marketing 101 class as an example of what not to do. It doesn't encourage me to sign up, but rather does the opposite. Is it an attempt at transparency? Let me just be clear here and say that the statement isn't correct. Yes, Simplicity is still selling the pattern, and as soon as they stop, I will publish it again afresh! The design is only licensed to Simplicity. Thankfully I am still the copyright owner and all rights revert back to me.
Now that I've worked with two "for profit" enterprises in my field, Craftsy and Simplicity, I am much wiser about these "collaborations". We independents do it for the chance at exposure, and I did gain some valuable working experience, but there is yet a list to be made of the good and the bad. In the end, would I say it was entirely worth the benefit? Once you enter into a deal with a corporation, it's like giving a gift to a stranger. You work so hard and give it all you can, but in the end you never know what they are going to do with the gift, so be prepared to just let it all go. Don't expect to be kept in the loop. It's not in the contract. You are the last person to discover it, yet it's your face or name on the front and held responsible by the public none the less.
So now you know. The future of this pattern remains in my keeping, and here's my promise: I promise the Tia dress pattern will be "forever" available after it finally drops off the wheel with Simplicity. Will we be safe in the hands of TN Marketing? That I can't say, but there must always be hope for a bright future!
Here's the links for the things I've been talking about in this post:
Here we are at WEEK 2 of the Pretty Petticoat Sew Along. How is your project going?
A lot has been said in the Facebook Group about the interfacing layout and WHY we must cut with the length of goods. Group member, Rebekah, has started her tutorial this week with a blunder in this direction and cautions you to not make the mistake she did. Let me give you a visual of the interfacing layout and all the reasons why you are instructed to do so:
Perhaps understanding the WHY will keep you from taking the same wrong turn.
A WORD OF CAUTION
I will now return to Rebekah's post for week 2, with a few edits from me for clarity:
Rebekah:
So this is where
I say DON’T DO WHAT I DID! Lol
The very first steps
in the instruction booklet specifically say:
So, I got ahead
of myself and decided to go against the grain… just DON’T! This
interfacing and most are only 20” wide, so not quite wide enough for the front
yoke to be placed crosswise on the on a lengthwise fold. I decided to avoid having to zig zag
two pieces together, so I turnedthe
pattern piece to the crosswise fold. As I sewed the yoke
together all seemed fine until… I had to baste the bottom of the yoke together.
The top layer or outer layer I didn’t interface. Just the inside layer (or my
facings).And since the yoke hem is on a
slight curve, it stretched a bit. Which means the 2 layers are uneven in
circumference around. It causes a fold … ick! ( below image of white yokeis from the very first attempt at this
petticoat last year and I got bummed and quit. Although now its been pulled out
and I’ll correct it). I refuse to waste fabric lol
REMEMBER:
place pattern pieces correctly on the grain and you will avoid such a
disappointment. I had a slight tuck on my black yoke which I was able to fix
easily enough. Not as severe as here on the white yoke.
Apply the Interfacing and Sew the Side Seams
Rebekah:
It’s hard to see
here, but I have placed some of my tracing paper down underneath my yoke pieces
and interfacings pieces. So as I press it won’t stick to my ironing board. It
peels away nicely and toss. No mess! Interfacing on top, facing down. No messy
iron either. After inter
facing, sew up you side seamsper
instructions. You will have two separate yokes.
Laura: Concerning the yokes, one will be your facing (to the inside, against the body) and the other will be to the outside. I recommend the yoke with the interfacing be the OUTSIDE, or fashion side. WHY? 1) Because it provides stability for your zipper and 2) because this is an undergarment, the interfacing provides a smooth surface for your clothing to move against.
Zipper Application
Rebekah:
Go ahead and baste shut the
center back seam on your yoke that is the fashion layer, not the interfaced
layer. And clip about every inch or so along the basting. It will help with
removing stitches once the zipper is in.
Laura:
So here is where Rebekah and I temporarily part ways. I do not recommend any kind of fusible, gummy strip, interfacing strip to hold or apply zippers. WHY?
Because they ARE sticky and add bulk, might be inappropriate for some fabrics and add expense. I worry about the risk. In the end, the adhesive doesn't do anything for me that a pin can't do so if you are okay with the old fashioned "pin the zipper tape to your seam allowance" method, this video will be of help to you. It's very long because I go through the whole process.
In the video I talk about zipper types and recommend against using an invisible zipper. The WHY behind this is that it's simply not sturdy enough to hold up
against the hard use this type of garment is sure to get.
Remember that centering the zipper teeth exactly over the seam allowance isn't critical. A mostly on center is good enough. If pins just don't do it for you, the tape is ready to serve. Rebekah does a wonderful job showing you how that is done.
Rebekah:
Here I’ve prepped for my zipper insertion with wonder tape ( it’s water
soluble & washes away). Just make sure it not too old or it may be past its
prime in quality.
Mark 5/8” down
from the top and make sure you place the zipper stop just beneath it. Peel off
the paper backing to expose the adhesive.
Placethe zipper face down on the adhesive, zipper
teeth centered right over the seam basted shut. Follow instructions for sewing
zipper down to just the seam allowance.
Once the zipper is in, I continued with
putting the yoke together. Don’t forget to trim your seams at the waist after
sewing the layers together, CLIP, its on a curve so it will help it to lay
flat. UNDERSTITCH the facing at the waist.
Laura:
Now you are ready to top stitch your zipper at center back. MARK the top stitching line from the seam on both sides before you stitch. Always stitch with the right side of the garment towards you. How can you see that the top stitching is straight if you aren't looking at it? Another good tip: I often use a walking foot to do my zipper top stitching, especially with long zippers, slippery or loosely woven, or stretchy (lycra) fabrics. This way, ALL layers can move forward in unison. Be sure to sew all the way to the top, moving your zipper pull out of the way.
Rebekah:
Here is my black
yoke,you can tell on the bottom right
where I had a tuck due to my incorrect interfacing direction. I fixed it as
well as I could without deconstructing the yoke too much. Also, this will be
inside the seam allowance after attaching the petticoat ruffles, so I didn’t
stress myself too much over it. If it was like the white yoke, then yes.
TIP: I serged with a single needle three thread
overlock stitch. But, be careful if you’ve chosen to use a 7” zipper. The zip
stop at the bottom will most likely be in the direct path of the needle on the
serger, so when you get to that part , slow down and hand walk your serger past
it so you don’t break a needle… ask me how I know! LolOR use a 9” zipper and then no zip stop to
worry about. Serging the edges cleans them up since they will be exposed after
petticoat is done. Or you can use a tight narrow zig zag If you don’t have a
serger, OR you can bind with bias binding! Which brings me to my next part.
Laura:
It's okay to shorten the Zipper above the stop before sewing.
Rebekah:
Have you
considered binding you hems? I adore the look of binding on the hem of a
petticoat. It gives a lovely finish in my opinion. But it will work just fine
without one also. So if price is a consideration, you can cut costs by not
bothering with binding. It can be a bit costly depending where you buy it.
I just happened
to have 2 yards of black cotton in my stash so I went to work making my own
bias binding. Not terribly hard, just an extra step and time , but since I had
it, I decided to make it!:) I saved myself $20-$40.
With the
settings I used on my pleater, I needed between 12-13 yrds of binding per
petticoat layer. So roughly 26 yrds give or take. I ended up with a lot more
from my 2 yards of black cotton fabric. A LOT more! So I have extra for another
project! Yay!
Also, binding
helps with the body and structure of your petticoat! BONUS!
If you want to
be real fancy, you can purchase or make satin/ acetate bias binding.
Etsy has it for
around $1.00/ yrd and higher.
Ebay,
amazon,( sources listed in materials
needed at beginning)
It comes in many
different widths. I would suggest ½” as opposed to ¼”. This comes after binding
my hems with the bias seam binding foot. The ½” allows a bit more of the fabric
to be grab in between the layers. Which keeps the binding from ripping off too
easily from the organza…. Ask me how I know! Again. Lol
And I suggest
double fold bias. It’s just easier to manage in my opinion. But use what you
are comfortable with.